flickr.com/knittycat


Tips & Techniques for Knitting theknittycat's Peeps and Other Toys

Showing posts with label knittycat. Show all posts

Tuesday, August 16, 2011

Grover / Super Grover for D's Birthday 2009(?)


Wheeee! Super Grover flies again!! 

Super Grover Flies Again

Smarter than a Speeding Bullet!
"onward and upward to do brave deeds.... up up and awaaaay...."


Look someone needs help!

Grover sees someone who needs help


This is a job for
Super Grover!

This is a job for Super Grover!


Up up and away!

Super Grover to the rescue - up up and away!


But first I have to hold Mother's hand to cross the street

Grover has to hold Mother's hand when crossing the street


...................


I'm still craftless, with hands wrapped like mummies now, but my poor Hub needed a Peep for his birthday. What could I do?

I had made Grover / Super Grover for him two years ago, but Grover was packed up (along with the other peeps) when we made a temporary forced move, because our place was being re-roofed.  Soooo ... I unpacked him and he flew in to sing Happy Birthday to my Hub!  ;o)


 "Happy birthday to youuu
happy birthday to youuuuuu......."


Grover was made much like Elmo and Cookie, but with facial features added. I hadn't intended to make an open mouth, but after knitting him up like the others, I just felt he NEEDED that big jaw. So unlike the all-in-one-piece method I used to make the open-mouthed Stitch and Sackboy, since this was an afterthought,  I made the jaw separately, sort of a watermelon wedge shape, and sewed it on.  His red mouth is an i-cord, sewn to the jaw.  I also added a kind of flattened sausage shape for his upper lip, and two little sausages for eyebrows.

This was definitely more work than using the flap /loopy legs technique for the mouth while knitting the head.


 Grover mugging in mug shots.  ;o)
Grover mugging in mug shots collage

Isn't that a cute little belly?!

His mouth is flexible and can be posed.


Super Grover's emblem is one of my few felt efforts (because I'm not good at that), and is attached to the cord of his cape, so that it's gone when he is in his secret identity of Grover.  :o)

Super Grover collage


Making his helmet was interesting as I remember, but it was two years ago so I don't remember much.  :o/   I knitted the helmet, but crocheted the visor so it would have more body.  I do remember that I crocheted the visor sideways.

You might observe that the visor is a bit flattened in some photos.  That happened while he was packed away and I didn't notice till after I took most of the pics. Easily fixed though.  :o)


close-ups of helmet
Super Grover's helmet collage


My hub and I were really happy to see Grover Peep again!  Yay!  And now he gives us smiles every day.  :o)


You may be seeing more of the peeps who were packed away in future posts.


theknittingkitty for theknittycat

Friday, July 29, 2011

Fuzzy Brushed Amigurumi and how they got that way


A Short History of Fuzzy Brushed Amigurumi (crocheted and knitted toys)

In response to a question asked regarding my post of Fuzzy Hello Kitty, I mentioned the history of the Brushed Amigurumi Technique.  There was a little confusion (lack of clarity on my part) and the commenter thought it was my technique, but no, I'm not so clever as that.  ;o)


(I've noted here my recollections which I have verified as best as I can with net research.)


Who's on first?

As I remember, my first encounter with this idea was in 2007, the first year I was making amigurumi.  Wibit, aka Roman Sock had made a fabulous Pomeranian, and described her method of getting that marvellous furry effect by brushing mohair, or mohair blend yarn with a wire pet slicker brush.
http://littlegreen.typepad.com/romansock/2007/09/my-pomerianians.html
http://littlegreen.typepad.com/romansock/2007/09/free-to-a-lovin.html

Roman Sock's adorable Crocheted and Brushed Pomeranian

You can get the free pattern here:
http://littlegreen.typepad.com/romansock/files/pomeranian.pdf

Roman Sock posted a tutorial on how to brush crocheted fabric, including the results with several types of yarns, here:
http://littlegreen.typepad.com/romansock/brushed-crochet.html


The Next Mentions of Using a Pet Slicker Brush

The next mention of this amazing brushed yarn technique, that I  remember seeing, was from Roxycraft, who has a terrific photo tutorial on how to achieve a fuzzy look with ordinary yarn and a slicker brush.
 ---link to Roxycraft's photo tute ---
http://tamiesnow.typepad.com/roxycraft/2009/06/tutorial-making-brushed-amigurumi.html

And later she did a crochet-along for a very cute fuzzy panda, with video tutorials.
(sorry, that pic won't post - click on the first link to see the panda)


--- links to Roxycraft's crochet along and video tute ----
http://blog.craftzine.com/archive/2009/09/crochet-along_fuzzy_panda_amig.html
http://blog.craftzine.com/archive/2009/09/crochet-along_lesson_one_-_the.html
http://blog.craftzine.com/archive/2009/09/crochet-along_lesson_two_-_ass.html


And there was also chezmichelle's fuzzy critters and information.   Possibly around mid 2008? Around the same time that I saw Roxycaft's, or maybe a couple of months before.  The wee fellow directly below was crocheted with bamboo yarn, which chezmichelle said gave an excellent result.


Link to chezmichelle and her cute free patterns here:
http://www.suncatchereyes.net/Fuzzball.html

Unfortunately, like many of us who had blogs on vox.com, chezmichelle lost hers when vox disappeared and much of her info seems to be unavailable.
(except for a few bits and pieces, without photos, through the wayback machine's web archive http://www.archive.org )

P.S. to the vox.com issue - I did transfer my blog to blogspot.com - I have never had the time/energy to fix the look of the early posts, whose formatting got rather messed up in the process of the transfer.  But at least the content is all there.


What kind of yarn fibers work well?

It seems as though you can use this brushing technique with most yarns, but best to test your yarn by brushing a swatch before starting a project.   Some will work better than others.  I've seen wonderful results from wool, bamboo and acrylic yarns, and I'm sure other fibers will work well also.  Cotton yarn may not yield the results we want, but I haven't tried it so can't say for sure.  I've used Caron's Simply Soft, Vanna's Choice and Bernat Softee Baby, acrylic yarns, and all worked well.  I'll post a wee limbless kitty soon (hopefully) that I made with Simply Soft.  The outcome was very soft and silky.  Vanna's Choice came out wonderfully fluffy and fuzzy (see my Fuzzy Hello Kitty).


It's very simple to do, and really magical!  :o)  A very nice crocheted or knit amigurumi suddenly becomes a fuzzy, furry, cuddly softie!  Okay, maybe not suddenly, it's a bit of work to get it to a really fuzzy state, but it's still like magic to me!  :o)


xposted to weloveamigurumi.livejournal.com and theknittycat.blogspot.com

theknittingkitty for theknittycat

Sunday, July 17, 2011

Lucy's Fuzzy Hello Kitty


Yet another Hello Kitty


Lucy's Hello Kitty

My most recent and hopefully my last Hello Kitty. Not that I don't think that HK is adorable, I just don't like working with so much white. By the time I finish that big white head I'm pretty bored with white yarn! ;o)

This one was made for Lucy and Baby MaryJane on the occasion of Lucy's birthday in May. :o) She has a little music box button inside that plays Brahm's Lullaby when you squeeze her tummy. :o)

You can hear the little music button playing here in this little video I made.
(little meaning simple, not small unfortunately)

(yeah, I know - I'm no budding cinematographer. Heh heh)

Lucy's Hello Kitty was crocheted with Vanna's choice yarn, just a plain acrylic (but nice stuff), and then brushed with a wire brush to make her all fuzzy!  In the white areas I held two yarns together, adding Lion Brand Microspun for a little shine, but when she was brushed  you couldn't really see the Microspun.

Here she is before fuzzing up. I had just brushed one foot for a bit, at that point, to try out the technique.


It's really amazing how well that works. I purchased a small dog slicker brush, but an even better tool that I used a lot is something called a nap riser brush, which I purchased here from knitting-warehouse.com. It's like a mini slicker brush that you slide over a finger. It lets you get into small spaces and you have a lot of control.

It does take some work to get this effect but I find working with fuzzy yarn to be challenging with knitting, and crazy-making with crochet! So fuzzing up plain yarn after I've knitted or crocheted a peep is an interesting alternative.

What amazes me is that after all that brushing and fuzzing, very little fiber actually came off of the yarn. I've tugged on the fibers and they seem very secure still.


Did you know that Hello Kitty has a tail?!  She DOES!   I didn't know that till I did my picture research for this one.  And this is the fourth one I've made!  I just never noticed before.  Yes I know she's a kitty, but she's kind of a humanistic kitty.  And besides, I'm kind of notorious for leaving off tails!  heh heh    But Lucy's HK has a tail!!  Hurray!


More pics in my flickr photo stream.


As some of you might remember, I injured my knitter mitts (hands) in my crazy Christmas marathon, and have been crocheting my peeps for awhile - okay that's been interesting and I've learned some tricks.   :o)   But being a knitaholic, I am really missing knitting them. Well, a couple of weeks ago ... Ummm this is embarrassing ... I overdid with the crocheting, and now I can't do ANY crafting!!!  Eeeek!! Making peeps keeps me sane.... Now what?  Heh heh. My hub has suggested learning to knit with my toes. Heh heh

Hmmm. I think he's scared. ;o)

Since I'm so behind in posting my peeps, I've got plenty of them waiting in the wings, and I may find time to put up a couple more of my adventures in crocheting them, while waiting for my hands to heal up enough to allow me to work on them some more.

I hope that everyone is enjoying the new weloveamigurumi community theme and their summer!


(xposted to weloveamigurumi and theknittycat's tips)


theknittingkitty for theknittycat

Friday, April 22, 2011

HAPPY EASTER! HAPPY SPRING! and Mimi the Eggy Peep in her Hot Air Balloon


Free Glitter Graphics


Meet Mimi the Eggy Peep in her Egg Cup and ....
flying in her Hot Air Balloon!  :o)


Mimi the Eggy Peep in her Egg Cup


I'm so sorry that I've been so swamped with making gifts for Easter and the many April birthdays in our family, for the past couple of months, and haven't been able to post anything!  I have still to write up the last installment of my Christmas peeps, and so many more peeps that I haven't had time to post.

After my "knitting injuries" from my far too zealous Christmas knitting, I've been *gasp* crocheting my wee peeps!  Oddly, at the moment, it hurts less to crochet than to knit!  But I have to take it slowly.  And I've been gaining even MORE respect and admiration for the amazing creations that my crocheting amigurumi-making (toy-making) friends come up with all the time, than I already HAD!  I'm finding it a lot harder to crochet ami's than to knit them !  Eeek!  heh heh 
(even though I've been crocheting other things than toys for YEARS!)  But I'm happy to be crocheting them till I can knit again.  I do have to stick with simple shapes, though.  No teensy limbs!!!  ha ha!  I tried!  ;o)   I've actually written up two posts chronicling my foray into crocheting toys but haven't yet had the opportunity to get the photos posted and finish them.  So that's something to look forward to.  ;o)  

I'll be posting more of my simple crocheting efforts soon.  I just HAD to get these pics of Mimi up right now, since my Hub and I got such a kick out of playing with her while taking them!  I hope you'll take a peek at the "Screaming Mimi" video we made.  heh heh


and Mimi with her Hot Air Balloon!


Wheeeeeeee!


Video of Screaming Mimi Taking a Ride is here!
(be sure to have your sound turned on...  hee hee)


I got this idea from a photo of an adorable design by "Crocheting Crab"

Who has a free pattern here


I didn't use a pattern but I've made notes of making Mimi in her eggcup so I may have a pattern in the future (you're on your own if you want a balloon like mine, though,  heh heh)

We're wishing you all a beautiful and Blessed Easter and

HAPPY SPRING!!!  :o)


theknittingkitty for theknittycat

Tuesday, January 4, 2011

Hello Kitty in Kimono - Crafty Christmas 2010

=^..^=

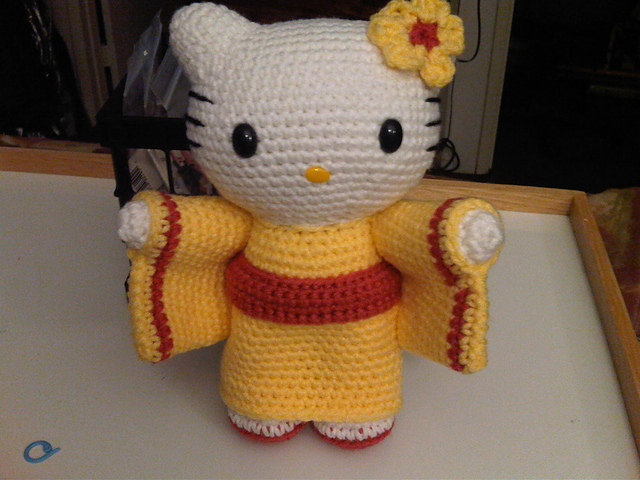
Hello Kitty in Kimono for Jennea - from my Crafty Christmas 2010

I put in a sneak peek of Hello Kitty in my last post (for New Year's Eve).
A very simple animation. :o)  But this post will give you the full intro.

When I was getting my HK photos ready to upload to my photostream on flickr, I noticed that if I put a few of them together, it made her move, and even bow (just a happy accident) ... I couldn't resist! I just had to animate her. ;o)


Isn't that FUN?!  I love animated gifs!  :o)


Hello Kitty in Kimono for Jennea
(holding still for her closeup)


a better view of her sleeves, and from the back


How to Poorly Plan Christmas Crafts
HK in Kimono is one of the multitude of projects that, two months ago, I suddenly, and unexpectedly, found that I needed to make for Christmas.   Since time was very short, I very cleverly designed projects that were much larger and more involved than my usual ones!  arrrgh!  And I'm not a speedy peepmaker!


size of HK in Kimono compared to
my first HK for Nicole


 (from my first year of peepmaking, 2007) 

 
So after making this "brilliant" plan and working like a madwoman for weeks, nearing the deadline I realized that the peep I had been working on for a good portion of that time (several weeks) turned out to be inappropriately delicate for her intended recipient, our lively, and very young niece, Mia.   So approaching the last minute, I had to start all over with another project for her!  (you'll be introduced to her replacement, Betty the Baby Bot in another post).  It happens that I totally LOVED what I wound up making for her (and so did she), but it would have been much more fun to have made it more leisurely.

It's been very challenging, but, working night and day, I got MOST of the projects done.  (yeah. I do NOT recommend crafting this way - made me really sick)  My Dear Hub's Piglet got postponed till after, and so did the Meowth for our wonderful nephew, who sweetly offered to let me make his after Christmas, so I wouldn't be so pressured.  :o)  Wasn't that a lovely Christmas gift?  I made him a simple thing (the pokemon character, Electrode - a red and white ball with a face) to tide him over till I make Meowth, and so he'd have something to open from us on Christmas Day, and now I'm off to make a tiny Meowth!  ;o)  And finish Piglet... and make my Hub yet another Lambie!!  He LOVES those lambies!  heh heh

Peeking at Peeps
Here's a peek at the projects I made for Christmas (all made in 2 months - there were four more, but those had already been sent to Scotland when I took this photo).  Please forgive the poor quality of the photo. I was in such a hurry at that point that I'm just grateful to have any pics at all!  Their individual photos are better, and I'll be sharing those in future posts.

 a wee peek of the group on the couch, waiting to be packaged up for gift giving
- toys for the kids and ornaments and earrings for the adults.

(yes, I did a lovely job of composing.   I especially love the disordered mass of ornaments.   ick.)

The gifts consisted of

5 large peeps:
Betty Baby Bot, Lizabeth Cuddle Lambie, Rosalie Flying Piglet, HK in Kimono, and Maria Teresa, the large doll that Baby Bot was replacing (who still needs her hair sewn on before she becomes a gift).

4 medium peeps
to Scotland (not in photo)
Elmo (who was actually finished in October), Dorothy Goldfish, Goldfish "Bowl", and Mirabelle Mousie

3 small peeps:
Terence the Terrapin, a Christmas tree with Santa sack, and the Blue Guy from the HTC cell phone commercials (my Hub loved those commercials, and that little guy!)

and 13 ornaments for the adults
No, your eyes don't deceive you. There are only 9 ornaments in that photo. I made 4 more after I took that pic.  (They look a lot prettier when they're not mushed up in a mass!  heh heh)

Plus 4 pairs of crystal earrings.

Whew!


And now some background about Hello Kitty in Kimono!  Finally!  :o)

My Inspiration
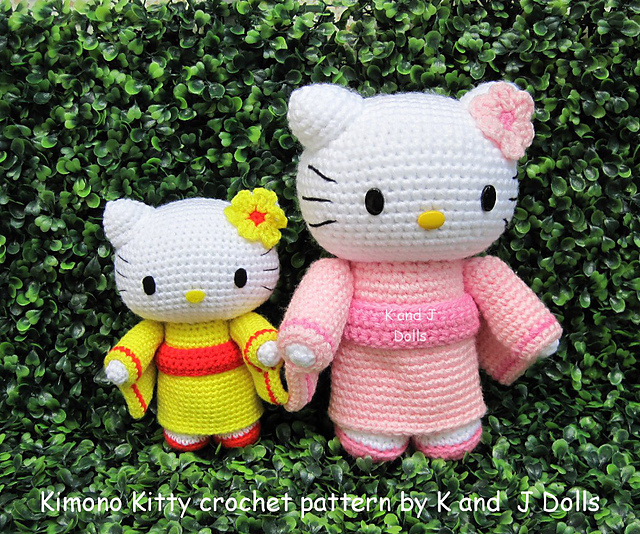
I was inspired to make this peep when I saw this adorable amigurumi Kimono Kitty
from a Kimono Kitty pattern written by kandjdolls. (brilliant designers, by the way!).

The Kimono Kitty was crocheted, and of course I'd be knitting mine, but that's not a problem since I was only using the photo as inspiration.  (as most of you know, I knit everything freehand, without patterns.)

Although flawed, I'm quite pleased at how HK in Kimono turned out.  I made her in Jennea's favorite color, purple!  And Jennea, a big HK fan, loved her!  :o)  Yay!!  If I'd had more time I'd have liked to make an accessory for her. I was thinking that a parasol would be super cute!  So if I ever have some spare time for it ... Yeah. Sure. Heh heh

Eyes and How Not to Make Them
I had some trouble making HK's eyes satisfactorily, and have discovered that Lion Brand Microspun is NOT a good choice for knotted yarn eyes (see my yarn knot eyes tutorial).  Since it’s so loosely spun, the knots don’t cohere into a “fused” ball, but separate. Soooo… back to the drawing board.

Since her eyes are oval and I didn't have any glass eyes in that shape, I resorted to a new method that, recently, I’ve been utilizing on occasion - flattened knitted ball eyes. I made a pair with Red Heart Lustersheen (a very light sport or fingering weight yarn), and those worked just fine. This is the first time I’ve made oval ones instead of round ones, but it wasn’t a problem. :o)


One more thing to add before I close...

No Pattern Available but Hints on How to Make Her
Several people have already asked me for a pattern for this knit Kimono Kitty, but I made no notes at all while knitting her (I was in too much of a hurry to stop and write what I was doing), and I won't be writing anything up for her.  But she is made up of very simple shapes;

Two tubes for her legs, a tapered tube for her body and kimono, and wide flattened tubes for her sleeves (stuffing a narrow tube shape at one end of each sleeve for her arms), with white balls on the ends for paws (or you could make whole white arm tubes and tuck them into one side of each sleeve). And a rounded 3D rectangle for her head - kind of a shallow box shape.  It should really be a bit more squared than I made it - similar width to height, I was so focused on not making it round that I made it a bit wider than I should have, but I still love her.  :o)  And rounded triangles for ears.

That, of course isn't quite the way I made her since I hate to sew bits together. Except for her arms, she's all one piece, and her paws are one piece with her arms.


More Posts?
I'm really hoping to make time to post more often, and get caught up on sharing my backlog of finished peeps. They feel very neglected not to have had their day on the blog!  They will most likely be posted as the whim takes me, and not in chronological order, but that doesn't really matter anyway, does it.


We hope that you all had a lovely holiday (I hope you planned your crafty gifts better than I did!!). 
We wish you the happiest new year ever!  :o)


theknittingkitty for theknittycat

Friday, December 31, 2010

HAPPY NEW YEAR!! and HK in Kimono in motion...


Wishing you all a wonderfully Happy New Year!  
Filled with LOTS of amigurumi and Peeps!!  :o)
with Love from theknittycat / Shar and Mr. theknittycat / anthor


theknittingkitty for theknittycat

Tuesday, October 5, 2010

Pattern Notes for Stitch - Lilo's Friend

^..^

Oh, YEAH?!  Just try and MAKE me!

Stitch (of Lilo and Stitch) late for Tony's Birthday

As requested, I'm making my pattern notes for Stitch (of Lilo and Stitch) available.
                                   (for more pics and Stitch's story, please see previous post)

This isn't a complete pattern, but most of it is there and I've spent the past few days cleaning it up and filling in some of the blanks. But it is still an incomplete and untested pattern. But it's free so I guess you're not risking much.   ;o) 

I won't be making another Stitch, so I won't be bringing this to any further level of completion, but if you find any glaring errors or come up with improvements that you'd like to share, please email or comment and I'll pass the info on.  :o)
You'll find the link to the PDF for Stitch's Pattern Notes on my patterns page.  You can click on the “Patterns and Tutorials” link at the top of this page or just click here.

Stitch is knit in the round (I used two circular needles) and his torso, 4 arms, and head are knit in one piece. Legs, ears, eyes, nose and color patches are knitted separately.  There are no seams. I would not suggest this for a beginning knitter. But determination is a wonderful thing.  :o)  I have included links for tutorials for some of the techniques I use.

I know that some of you totally enjoy these larger projects (Yesterday, I saw an etsy listing for a crocheted Mickey Mouse, and a Snoopy too, the size of a 10-year-old child!! WOW!), but since I really dislike making these larger ones, I have promised myself to make only the smaller peeps from now on. The larger ones take so much time, and I don't like to devote so much of my time to one project. There are sooooo many more peeps that I want to make, and that I have on my list as requests, So this was my last of this size.  It was a labor of love for our nephew.

Back to the wee peeps! Yay!

Oh, my fingers are itching to knit another Hello Kitty ...
I'm just dying to make one after seeing a totally adorable crocheted one that K and J Dolls has available! But I have too many other peeps that I need to get to, so I don't know when I can squeeze her in. Drat!

Here's my one and only Hello Kitty, made in my early days of toy knitting (made for an adult - thus the bead bling).

Hello Kitty for Nicole front 3 qtr

The one by K and J is just wonderful! I love their designs! If you crochet your creations (I don't, because of hand issues), and if you work from patterns (I don't do that either), you should definitely check them out!

A last note... I'm just finishing up a new pattern for Elmo (it will be for Cookie also), using a more standard toy knitting approach than my original doubleknit pattern. Though the original was easy to do, and it was fun to use the doubleknitting, I really prefer the results of doing it this way. It's neater all around. The stitches are tighter and you have better control over the increases and decreases. (doubleknitting by nature is looser because of the slipping of stitches) I'm just finishing making one more Elmo using the pattern (another request, but a good opportunity to test the pattern again) and then I'll post it.

Okay, I know you want to know where to find that giant crocheted Mickey Mouse pattern! Heh heh.
He's here: http://www.etsy.com/shop/Chonticha
along with a bunch of other wonderful designs! Including a super adorable crocheted Lilo AND Stitch pattern! This designer is so talented!

And here's the link for K and J Dolls' Hello Kitty,
http://kandjdolls.blogspot.com/2010/09/kimono-kitty-by-theresa.html
and to the rest of their patterns. I just love everything they do!
http://kandjdolls.blogspot.com
http://kandjdolls.etsy.com/

Oh, pfui! In getting the links, I just read that they’ve had to take down their HK patterns due to a complaint by Sanrio. :o/ Well, you can still use the photos as inspiration, anyway. That’s what I do.   ;o)  It’s certainly reasonable for Sanrio to stop people from profiting from their property, but wouldn’t it be nicer to ask the transgressors for a percentage of their profit instead of robbing the world of such cuteness? *sigh* She did such a great job of designing those HK’s!  :o/

Hope you're all having a great week! It's raining here, and in Sunny Southern California, it's a welcome relief! I love the rain.  :o)  Especially after that scorching week of Indian Summer we just had.

Wishing you all the Best!

Thursday, September 30, 2010

Animated Amigurumi Peeps - Stitch (but no Lilo)

                                                                                                                                         ^..^
FINALLY!!! A very belated gift for Tony's April birthday (yes, APRIL! I'm so behind!)
  Update: Pattern now available!  See the following post (link to the pdf is on the patterns page):
    http://theknittycat.blogspot.com/2010/10/pattern-notes-for-stitch-lilos-friend.html

- Stitch -
the little blue alien from Lilo and Stitch


Oh did this guy give me trouble!!! He's much larger than my usual, and with that huge head, it was like wrestling with a fat blue baby!! :o) Four arms, 16 claws, 8 toenails, 16 big TEETH!! Whew! He took me AGES! I started him in February, and just finished him last week!!! (okay, yes, I did make a lot of other peeps in between, but he was so exhausting for me to work on, I had to keep putting him aside!) But he's finally done and Tony really really loves him! So it was all worth it! Well ... now that it's done, it was worth it!! ;o)

I'll never do it again! I've sworn off making large peeps and I'm sticking to small and tiny ones! :o) Okay, my friends say they've heard that before... but this time I MEAN it! Really! Honest! heh heh

I knit Stitch from the bottom up. His body, arms and head are knitted in one piece with the medium blue yarn, and his legs, ears and nose (and color patches) are grafted on.

here he is with some of my photo references


Aren't those marvelous buttons for his eyes?!
I tried sooo many different things and was not happy at all, then my dear Hubbard came home one day with these beauties! :o)

and here with more photo references


and from the back showing his tattoos(?) Well, his dark blue markings.
I'm not sure what exactly they are.


Did you know that Stitch had a little nub of a tail? I didn't till I started researching photos! :o) I forgot to take pics of the bottoms of his feet, but they have blue circular patches (you can see them a little bit in this pic above) - knitted in, not sewn on, since I could do them in the round while I made the circular bottoms of the feet.

And so you can see his relative size - here he is in my hand and from the side
(see the notch in the top area of his ear?)


    Just for reference... this is the size of
    peep that I like to make!  :o)

Cookie Monster in My Hand
Cookie Monster Peep


Restraining his enthusiasm!

(and another notch, in the bottom area of this ear)

You can kind of see in this picture that he's nice and squishy.
Nice and cuddly, except for his giant button eyes! :o)

With two layers of knitting and curled around at the bottom, even as large as they are, the ears came out surprisingly poseable. :o)


RAAAAARRRRRGGGHH!

heh heh

Something about his big open mouth seems to fascinate people. :o)
Everyone wants to stick their hands in it! heh heh


including ME!


I told Tony that Stitch is like that wall sculpture in Rome (Boca Della Verita - the Mouth of Truth)...
If you tell a lie while you have your hand stuck in his mouth, he'll BITE it! ;o)

Almost a Pattern
I don’t have an actual pattern for Stitch (and won’t be writing one), but I did discover, just last night, that I made LOTS of notes as I was knitting him, which I had totally forgotten doing. I wrote out nearly everything I did, but not quite - there are missing bits. I did not complete the head decreasing instructions, and did not note how I made the patches for his tummy and back. (Frankly, I didn’t do such a great job on those patches anyway - you could do better, I'm sure.)

I may make my notes available in a pdf later, if folks want them.   
UPDATE:  Pattern now available. See this post for pattern information

Color Patches
As you can see, there are a lot of color patches on Stitch. I'm dreadful at knitting colorwork! I just hate doing it, and it never looks neat to me, so I usually avoid it very carefully! heh heh But since Stitch had all these different shades of blue, I had to work out something. As usually happens, I try various ways of knitting the color in, and wind up chucking that idea, and making separate patches of the colors and grafting them on. :o/

Weeks after knitting Stitch's color patches, I recently was working on Snorlax for Matt (see next post for Snorlax and Jigglypuff) and came up against my nemesis again... colorwork! I made a determined effort to find a good way to do intarsia in the round, since I always work in the round (intarsia worked flat is not such an issue). So I did a bunch of research, and tried a few things out, and was - again - very dissatisfied!! Well, in my opinion, it seems there isn't a "good" way, just work arounds. Gave that idea up and relegated myself to another set of less than satisfactory patches to stitch on. But then I came up with a better way to make the patches! I was very pleased with the outcome on Snorlax and wish I'd discovered the idea while I was making Stitch. But better late than never, I guess. And I'm less disgusted at the thought of making another peep with color patches again! But I'll still avoid it when I can!! ;o)


Update: you can see how I made his teeth and claws in the pattern, which is now available.  
See the next post (the link to the pdf is on the patterns page):
http://theknittycat.blogspot.com/2010/10/pattern-notes-for-stitch-lilos-friend.html

Teeth
In case you're wondering how I made Stitch's teeth (all 16 of them!!) ... since I reeeeaaaallllyyy did NOT want to make sixteen little pieces and sew each of them on (YUCK!) I tried a few different ideas and settled on knitting them from side to side (actually in the round so they'd be 3 dimensional) in a long strip, using short rows for the shaping (details in my notes). That worked fine! :o) They're two strips of teeth, which I later sewed into his mouth. After grafting the teeth in (using kitchener stitch) I still felt there should be some overlap of his blue lip onto his teeth so I went around his mouth, pulling the blue fabric over the teeth and stitching it down. Yes, it was tricky with that big blue head attached to the big blue body hanging off of what I was sewing!! heh heh My hands still hurt!!!

Claws
For his claws and toenails I knitted short I-cords and pulled them in between the stitches of his paws and feet. For the toenails I used one I-cord for each foot. For each foot, I pulled the completed cord through every couple of stitches, over and under, horizontally. For his claws I made one I-cord for every two claws (two for each paw, making four claws per paw). I pulled the finished cord into one stitch and out another, a couple of stitches over, and stitched them in place to ensure that they wouldn't pull out. That worked extremely well, and I used the same method for Snorlax's teeny claws (see next post).

Vox.com
One last note:
Today is Vox.com's last day ... so goodbye to vox ...
and HELLO! to blogspot.com! :o) So far I'm quite happy with how well things work here! Yay!