^..^
FINALLY!!! A very belated gift for Tony's April birthday (yes, APRIL! I'm so behind!)
Update: Pattern now available! See the following post (link to the pdf is on the patterns page):
http://theknittycat.blogspot.com/2010/10/pattern-notes-for-stitch-lilos-friend.html
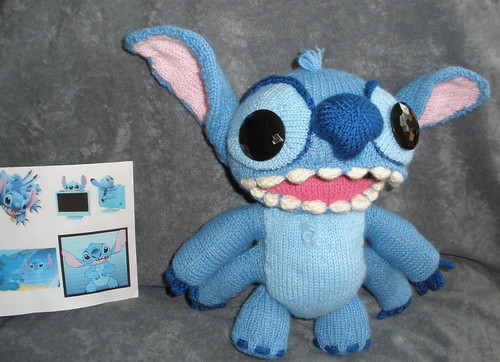
- Stitch -
the little blue alien from Lilo and Stitch

Oh did this guy give me trouble!!! He's much larger than my usual, and with that huge head, it was like wrestling with a fat blue baby!! :o) Four arms, 16 claws, 8 toenails, 16 big TEETH!! Whew! He took me AGES! I started him in February, and just finished him last week!!! (okay, yes, I did make a lot of other peeps in between, but he was so exhausting for me to work on, I had to keep putting him aside!) But he's finally done and Tony really really loves him! So it was all worth it! Well ... now that it's done, it was worth it!! ;o)
I'll never do it again! I've sworn off making large peeps and I'm sticking to small and tiny ones! :o) Okay, my friends say they've heard that before... but this time I MEAN it! Really! Honest! heh heh
I knit Stitch from the bottom up. His body, arms and head are knitted in one piece with the medium blue yarn, and his legs, ears and nose (and color patches) are grafted on.
here he is with some of my photo references

Aren't those marvelous buttons for his eyes?!
I tried sooo many different things and was not happy at all, then my dear Hubbard came home one day with these beauties! :o)
and here with more photo references
and from the back showing his tattoos(?) Well, his dark blue markings.
I'm not sure what exactly they are.

Did you know that Stitch had a little nub of a tail? I didn't till I started researching photos! :o) I forgot to take pics of the bottoms of his feet, but they have blue circular patches (you can see them a little bit in this pic above) - knitted in, not sewn on, since I could do them in the round while I made the circular bottoms of the feet.
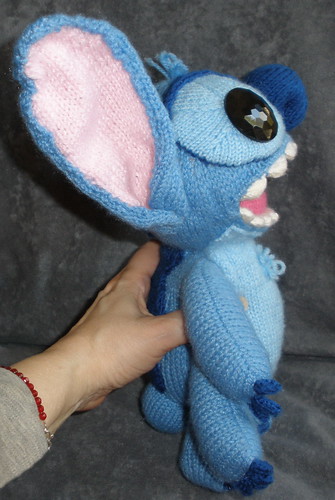
And so you can see his relative size - here he is in my hand and from the side
(see the notch in the top area of his ear?)
Just for reference... this is the size of
peep that I like to make! :o)
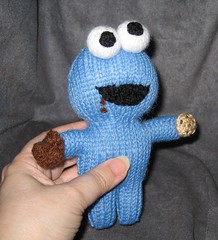 |
| Cookie Monster Peep |
Restraining his enthusiasm!
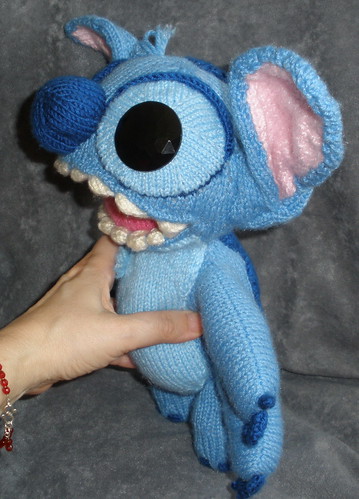
(and another notch, in the bottom area of this ear)
You can kind of see in this picture that he's nice and squishy.
Nice and cuddly, except for his giant button eyes! :o)
With two layers of knitting and curled around at the bottom, even as large as they are, the ears came out surprisingly poseable. :o)
RAAAAARRRRRGGGHH!

heh heh
Something about his big open mouth seems to fascinate people. :o)
Everyone wants to stick their hands in it! heh heh

including ME!

I told Tony that Stitch is like that wall sculpture in Rome (
Boca Della Verita - the Mouth of Truth)...
If you tell a lie while you have your hand stuck in his mouth, he'll BITE it! ;o)
Almost a Pattern
I don’t have an actual pattern for Stitch (and won’t be writing one), but I did discover, just last night, that I made LOTS of notes as I was knitting him, which I had totally forgotten doing. I wrote out nearly everything I did, but not quite - there are missing bits. I did not complete the head decreasing instructions, and did not note how I made the patches for his tummy and back. (Frankly, I didn’t do such a great job on those patches anyway - you could do better, I'm sure.)
I may make my notes available in a pdf later, if folks want them.
UPDATE: Pattern now available. See
this post for pattern information
Color Patches
As you can see, there are a lot of color patches on Stitch. I'm dreadful at knitting colorwork! I just hate doing it, and it never looks neat to me, so I usually avoid it very carefully! heh heh But since Stitch had all these different shades of blue, I had to work out something. As usually happens, I try various ways of knitting the color in, and wind up chucking that idea, and making separate patches of the colors and grafting them on. :o/
Weeks after knitting Stitch's color patches, I recently was working on Snorlax for Matt (see next post for Snorlax and Jigglypuff) and came up against my nemesis again... colorwork! I made a determined effort to find a good way to do intarsia in the round, since I always work in the round (intarsia worked flat is not such an issue). So I did a bunch of research, and tried a few things out, and was - again - very dissatisfied!! Well, in my opinion, it seems there isn't a "good" way, just work arounds. Gave that idea up and relegated myself to another set of less than satisfactory patches to stitch on. But then I came up with a better way to make the patches! I was very pleased with the outcome on Snorlax and wish I'd discovered the idea while I was making Stitch. But better late than never, I guess. And I'm less disgusted at the thought of making another peep with color patches again! But I'll still avoid it when I can!! ;o)
Update: you can see how I made his teeth and claws in the pattern, which is now available.
See the next post (the link to the pdf is on the patterns page):
http://theknittycat.blogspot.com/2010/10/pattern-notes-for-stitch-lilos-friend.html
Teeth
In case you're wondering how I made Stitch's teeth (all 16 of them!!) ... since I reeeeaaaallllyyy did NOT want to make sixteen little pieces and sew each of them on (YUCK!) I tried a few different ideas and settled on knitting them from side to side (actually in the round so they'd be 3 dimensional) in a long strip, using short rows for the shaping (details in my notes). That worked fine! :o) They're two strips of teeth, which I later sewed into his mouth. After grafting the teeth in (using kitchener stitch) I still felt there should be some overlap of his blue lip onto his teeth so I went around his mouth, pulling the blue fabric over the teeth and stitching it down. Yes, it was tricky with that big blue head attached to the big blue body hanging off of what I was sewing!! heh heh My hands still hurt!!!
Claws
For his claws and toenails I knitted short I-cords and pulled them in between the stitches of his paws and feet. For the toenails I used one I-cord for each foot. For each foot, I pulled the completed cord through every couple of stitches, over and under, horizontally. For his claws I made one I-cord for every two claws (two for each paw, making four claws per paw). I pulled the finished cord into one stitch and out another, a couple of stitches over, and stitched them in place to ensure that they wouldn't pull out. That worked extremely well, and I used the same method for Snorlax's teeny claws (see next post).
Vox.com
One last note:
Today is Vox.com's last day ... so goodbye to vox ...
and HELLO! to blogspot.com! :o) So far I'm quite happy with how well things work here! Yay!