flickr.com/knittycat


Tips & Techniques for Knitting theknittycat's Peeps and Other Toys

Showing posts with label eggs. Show all posts

Wednesday, March 12, 2014

Legs for Eggs with Leggs

......

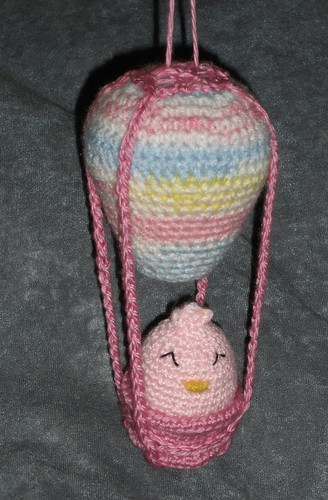
        Spring is coming!!  :o) 

                   
              Getting ready for a        


My dear friend, 
Chiwaluv (of Chiwaluv Amigurumi http://www.blogger.com/profile/10814053987758155829 ) 
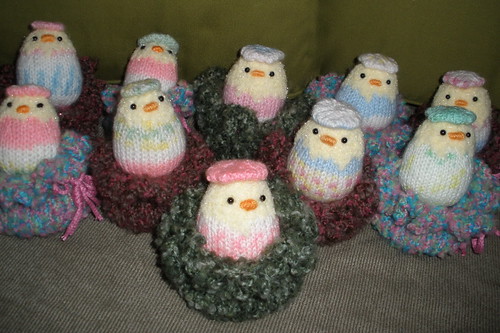
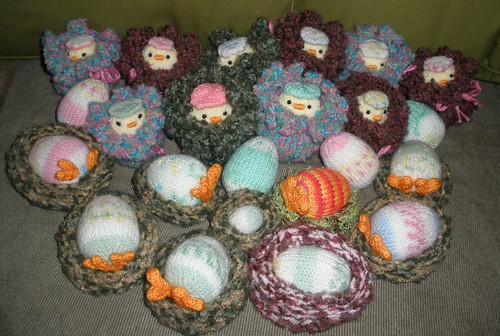
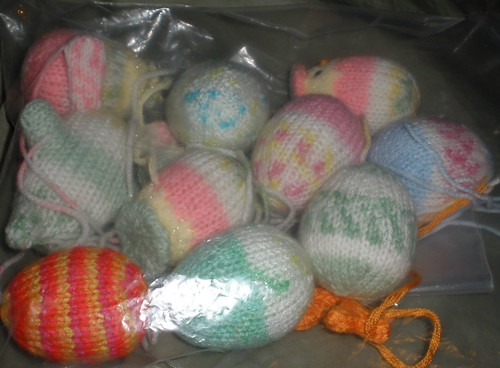
asked me how to make the legs/feet for the Eggs with Leggs, and I wrote this up for her.   Since Easter is getting close, I'm sharing it with anyone who'd like to make these funny little guys.  :o)    We found them to be very amusing. 


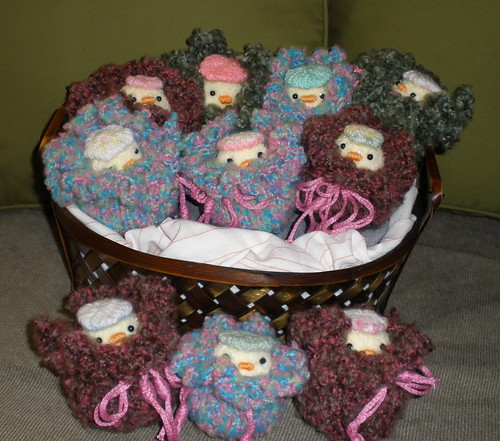
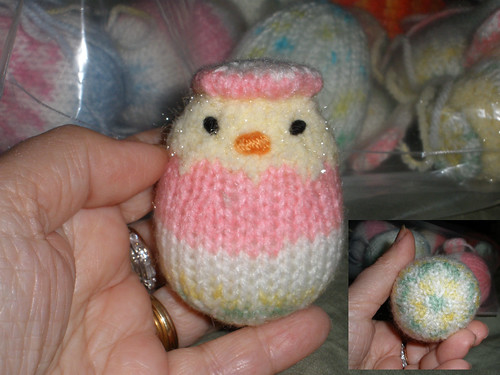
For more about the Eggs with Leggs, and their cousins, the Eggy Peeps (including a pattern), please see these posts:
And


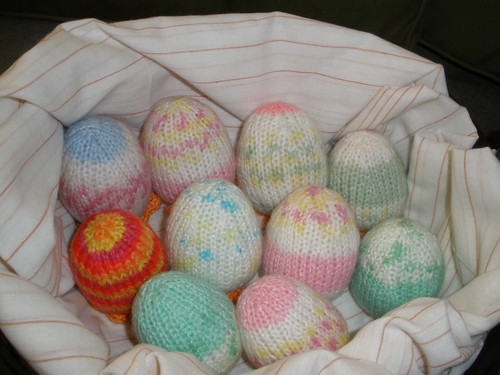
Note: although the available color patterns are not the same as when I made these, four years ago (!), you can still find some terrific patterns in Bernat Baby Jacquards here:
And other places.  Self patterning sock yarns would work well too, just use appropriate needle sizes to make a tightly knit fabric so the stuffing doesn't show.   Or if you're energetic, create your own stripes and patterns. ;o) 


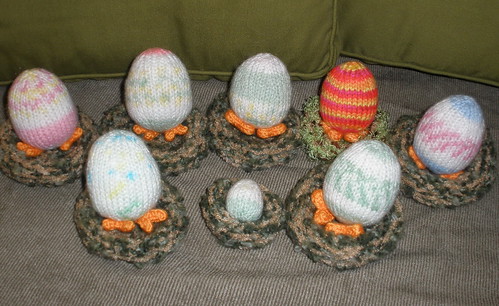
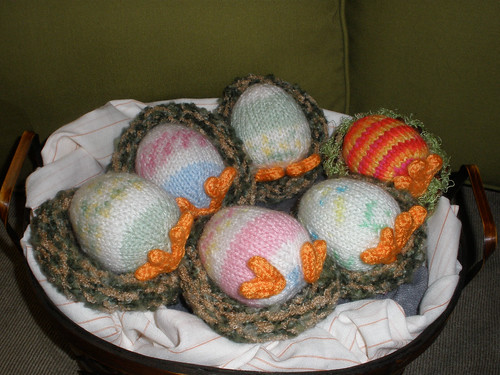
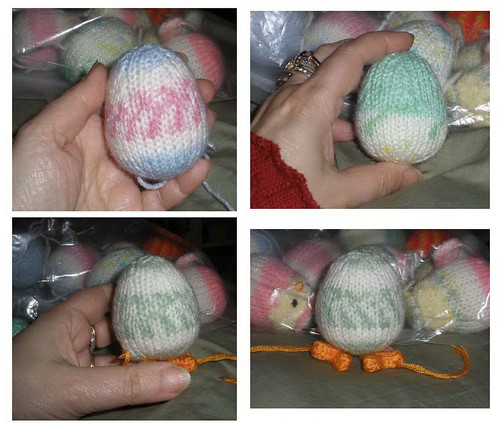
Here are the Leggs instructions for the Eggs with Leggs.  I hope it's understandable.   It's just icord folded and stitched, but not so easy to describe how to do it.  Heh heh.  


Leggs for Eggs with Leggs

I made a 6.5" to 7" 4st icord out of orange Microspun (probably on sz 3 ndls)
as follows:

1. C/o 4 st
2. K arnd on 4 st till cord is 6.5" - 7" long. 
3. End off. 

Fold and stitch the icord into two "Y" shaped feet (using 1 icord to shape both feet - attached at the bottom of the "Y") as follows:
(I separated a length of matching yarn into two parts, half the strands in each, for sewing it together.  But thread would work too.)

1. Holding the end of the icord vertically, go up 1/2" from the end of the cord held in your fingers, run the tapestry needle with yarn or thread thru, go up another 1/2" and fold down. 
2. 1/2" from the first fold, fold up and run tapestry needle thru the fold.
3. 1/2" up from the second fold, fold down.  Run needle thru all 4 strands. 
4. Down another 1/2" (down 1" from the third fold), stitch down to the last fold and through the start of the icord (1 foot is shaped). 
 ** Do not cut icord. ** 
 ** You will continue with the second foot on the same cord. **
5. Fold cord up from last fold and run stitch thru the fold. 
6. Repeat steps 1-4 for the second foot. 
7. Sew to bottom of egg. 

Without the stitching, the folds will look like 2 "M"s with long outer legs.


I'm sorry I don't have a better photo of the legs.  These were all given away and I didn't take any pics of the legs on their own.  :o( 


Wishing you all a very Happy Spring!!  It'll be here soon, I promise!  :o)   
And have fun with your Eggy Peeps and Eggs with Leggs!


Sunday, April 8, 2012

Happy Easter, Happy Spring! :o)


Kickass Profile Graphics


wishing all of you joy at this wonderful time of year!

with love from
theknittycat and mr. theknittycat (anthor)


Easter Owlies Coming Soon!
(oops!  How did that Kitty Peep Ball sneak in there?)


theknittingkitty for theknittycat

Friday, April 22, 2011

HAPPY EASTER! HAPPY SPRING! and Mimi the Eggy Peep in her Hot Air Balloon


Free Glitter Graphics


Meet Mimi the Eggy Peep in her Egg Cup and ....
flying in her Hot Air Balloon!  :o)


Mimi the Eggy Peep in her Egg Cup


I'm so sorry that I've been so swamped with making gifts for Easter and the many April birthdays in our family, for the past couple of months, and haven't been able to post anything!  I have still to write up the last installment of my Christmas peeps, and so many more peeps that I haven't had time to post.

After my "knitting injuries" from my far too zealous Christmas knitting, I've been *gasp* crocheting my wee peeps!  Oddly, at the moment, it hurts less to crochet than to knit!  But I have to take it slowly.  And I've been gaining even MORE respect and admiration for the amazing creations that my crocheting amigurumi-making (toy-making) friends come up with all the time, than I already HAD!  I'm finding it a lot harder to crochet ami's than to knit them !  Eeek!  heh heh 
(even though I've been crocheting other things than toys for YEARS!)  But I'm happy to be crocheting them till I can knit again.  I do have to stick with simple shapes, though.  No teensy limbs!!!  ha ha!  I tried!  ;o)   I've actually written up two posts chronicling my foray into crocheting toys but haven't yet had the opportunity to get the photos posted and finish them.  So that's something to look forward to.  ;o)  

I'll be posting more of my simple crocheting efforts soon.  I just HAD to get these pics of Mimi up right now, since my Hub and I got such a kick out of playing with her while taking them!  I hope you'll take a peek at the "Screaming Mimi" video we made.  heh heh


and Mimi with her Hot Air Balloon!


Wheeeeeeee!


Video of Screaming Mimi Taking a Ride is here!
(be sure to have your sound turned on...  hee hee)


I got this idea from a photo of an adorable design by "Crocheting Crab"

Who has a free pattern here


I didn't use a pattern but I've made notes of making Mimi in her eggcup so I may have a pattern in the future (you're on your own if you want a balloon like mine, though,  heh heh)

We're wishing you all a beautiful and Blessed Easter and

HAPPY SPRING!!!  :o)


theknittingkitty for theknittycat

Sunday, April 4, 2010

HAPPY EASTER!! A Plethora of Peeps! :o)

HAPPY EASTER!!


A Plethora of Peeps... 

Finally the peeps I've been working on for Easter are DONE!!  and ready for giving!  :o)

HAPPY EASTER!!  :o) Easter Eggy Peeps

Little Eggy Peeps sitting atop their wee pouch nests
if you missed my previous preview post about this wonderful self-patterning yarn
and a simple pattern it's here.


HAPPY EASTER!!  :o)  Easter Eggy Peeps
Lots of  Eggy Peeps and Easter Eggs and  Eggs with Leggs  :o)

HAPPY EASTER!!  Eggs with Leggs
Eggs with Leggs sitting on their little nests.  :o)
 
Easter Eggy Peeps
My favorite egg.
 
Easter Egg Pin Cushion Ring
an egg ring pin cushion for my sis. I tried it and it works GREAT!  I have to make one for myself!  :o)

Easter Eggs knitted with self patterning yarn
a basket of eggs showing the very cool patterning this great yarn makes!

Easter Eggs with Leggs
okay I love this photo!  heh heh  Eggys with Leggys!  hee hee

Easter Eggy Peeps
Easter Eggy Peeps tucked inside their little pouch nests
 

We wish you all a very Happy Easter!! 
and a joyous Spring!!


Don't you just LOVE SPRING?!!!  Yay!  Flowers and baby animals and sunshine!!  What could be happier?!  :o)

Read and post comments | Send to a friend

Friday, April 2, 2010

What happens to the eggs the Easter Bunny Brings? :o)


Have you ever wondered what hatches out
of the eggs laid by the Easter Bunny?

What happens to eggs laid by the Easter Bunny... Smaller GIF


(click on the picture if it's not moving...)

hee hee

Eggy/Bunny Pattern pdf is available here.

When I made this nest (part of the many peeps and accessories made for Easter gifts), I couldn't decide which side should be the outside, because I liked the patterning of the yarns so much on the knit side, but it looked more like a basket than a nest on the knit side... soooooo... And that's how I get my ideas!  heh heh

I don't have a pattern for the nest/basket, but it is a simple circle with sides, made with two bulky textured yarns held together (in this case Bernat's Soft Boucle and TLC Amore).  See the directions for the Eggy Peeps in the previous entry.  It will be the same, up to the point where you begin to decrease.  You won't do any decreasing.  Just keep knitting around till it's the height you want, making sure it's enough to get the top to curl down (sometimes stockinette's inherent curl is your friend), and then bind off.  You don't want a loose bind off for this.  The handle of the basket is simply i-cord.  Make sure it's the length of the curve that you want to tuck it into, so it won't show.


Saturday, February 27, 2010

Eggy Peeps, Pretty Easter Egg Yarn, And Free Pattern!! :o)

I recently got some beautiful self-patterning yarn, Bernat Baby Jacquard, to make some socks and while looking at the socks I had made from one of the skeins, I thought that it would make wonderful Easter Eggs!  :o)  Soooo....

Chiwaluv and I were "chatting" about the Easter Eggs and Eggy Peeps, that I'm making for Easter gifts, and it occured to me that you folks might like to know about the yarn for your Easter knitting and crocheting.

I'm including notes for how I knit my eggs, plus a few egg pattern links, both in crochet and knit ....


Easter Eggs and Eggy Peeps in progress

inset is the pattern on the bottom of the egg


The one with feet (in progress - ends still sticking out and feet just pinned on) is from the
same skein as the hatching egg!


a bunch of eggs and one Eggy Bunny in progress
(the orange and yellow striped egg is made with a variegated yarn
-Red Heart Kids, I think- for a special nephew who adores those colors)

This Bernat Baby Jacquard yarn is just terrific!  From one skein, you will get lots of eggs, each different from the others.  The eggs I've made (so far) are from three different colorways, but just from one skein, I've gotten several egg designs with real variety!  :o)

I'm also making little nests and bags for the peeps.  Nothing so elaborate as last year, since I'm still quite sick, but I LOVE making these sweet eggies!

Knitting the self patterning yarn in the round creates these wonderful patterns that they were designed for, but it would be very interesting to crochet with it (or knit the eggs flat) to see what kind of patterning that makes, too!  :o)

My version of eggs is super simple.  They could be done on dpns or converted to flat but I knit them  in the round on two circular needles.  If you haven't tried two circs yet, this would be a good opportunity to try them on such small projects -  it's soooo much easier using the two circs than working with dpns, and it's much easier on your hands as well.  Of course that's just my opinion that they're easier to work with - 'cause I'm not coordinated enough to use dpns.  ;o)

Pattern Notes:
Using Bernat Baby Jacquard or other self patterning or variegated yarn and (2) U.S. sz 3 circular needles...

I make my eggs like I'm making a ball for the first half, then just add a couple of extra plain rounds to the middle (in addition to the couple of plain rounds you normally do) to elongate it. Then for the decreasing
rounds, I do two plain rounds between the decrease rounds instead of one which makes the tapered top.

Disclaimer:  These pattern notes have not been tested, so if you're unsure, use one of the patterns written by the experts that I've linked to at the bottom of this post.

1. Using two circular needles (I'm using U.S. sz 3's), cast on 6 st 
with Judy Becker's Magic Cast On
(or cable c/o 3 on 1 ndl, k acr, p/u  3 on 2nd ndl from bottom of cast on)
2. Inc in ea st (inc1, k1) arnd (12)
3. K arnd
4. (Inc1, k2) arnd (18)
5. K arnd
6. (Inc1, k3) arnd (24)
7. K arnd
Cont. in this manner, increasing 6 st ev rnd till you reach the 
diameter you want (I went to 36 stitches)
8. (Inc1, k4) arnd (30)
9. K arnd
10. (Inc1, k5) arnd (36)
11. K arnd 8 or 9 times
Start decreasing in the same way that you increased, but with an extra 
knit rnd between (decrease 6 st ev third rnd)...
Oh and start stuffing before the hole gets small!  ;o)
12. (K2tog, k4) arnd (30 st)
13. K arnd 2x
14. (K2tog, k3) arnd (24 st)
15. K arnd 2x
16. (K2tog, k2) arnd (18 st)
17. K arnd 2x
18. (K2tog, k1) arnd (12 st)
19. K arnd (only 1x to make it a little more rounded at the top)
20. K2tog arnd (6 st)
 Kitchener st closed (or close as you would normally close a ball)

Hatching Easter Eggy Peeps

Make the same as the eggs, but switch to yellow yarn (I used a fuzzy  yarn) after the first decrease round.
 (I carry the egg yarn up through the egg to make the cap in one piece with the egg, instead of breaking and reattaching it.)
Add a cap by knitting a disk and sewing it on, or in one piece as follows:

When you have decreased down to 6 st again, switch to egg yarn
rpt  steps 2-7 of the beginning of the egg pattern
Then decrease back down again as you would decrease for a ball.
1. (K2tog, k2) arnd (18)
2. K arnd
3. (K2tog, k1) arnd (12)
4. K arnd
5. (k2tog arnd (6)
6. Kitchener st closed (or use your favorite method of closing)

Flatten the shape you have just made and stitch it down with the tail of yarn.
Add a few bits of yellow below the start of the yellow rounds with duplicate stitch to make it look jagged, or you can slip some of the stitches on the first round of yellow.


Update 03/12/14

Pattern notes for Leggs for "Eggs with Leggs" now available here:
 
If you want to crochet eggs, I would think it's the same premise except eliminate half of the knit plain rounds.  So you'd increase every round till reaching your desired diameter (like making a ball), crochet around several times without increasing,  and then decrease every other round to taper.

And here are free patterns from the experts... 
Littlecottonrabbits' pattern includes really beautiful fairisle ones!
(I don't like to do colorwork, so I LOVE self-patterning yarn!!)

Jean Greenhowe's free pattern (knit flat)
http://www.jeangreenhowe.com/Images/Novelty_Eggs.pdf

Littlecottonrabbit's free pattern knit flat with fairisle instructions for pretty colorwork!
http://littlecottonrabbits.typepad.co.uk/free_knitting_patterns/

Curlypurly's, purlbee's and emmyknits, in-the-round on dpns free patterns
http://www.curlypurly.com/eggs.html
http://www.purlbee.com/knitted-easter-eggs/
http://emmyknits.wordpress.com/2009/04/11/easy-knitted-easter-eggs/

And here's a couple of crochet patterns that I found, too!:
http://knittingcrochet.suite101.com/article.cfm/easter_egg_crochet_pattern
http://www.thecraftytipster.com/amigurumi-egg.html

I bought the yarn here:
http://www.joann.com/joann/catalog/productdetail.jsp?pageName=search&flag=true&PRODID=xprd561154


Spring is coming! Yay!


Read and post comments | Send to a friend

Saturday, April 11, 2009

HAPPY EASTER! HAPPY SPRING!

HAPPY EASTER!  HAPPY SPRING!


Here's a preview of the peeps I made for Easter ...  I'll put up more shots of them soon.  I had such fun making these limbless peeps!  And I had some wonderful yarn to play with, sent to me by my friend, Romana, of YarnCloud Yarns (www.yarncloud.com)!  The textures and colors were exciting and fun!  I loved putting together the various color schemes for each of the basket/peep sets.


More about this soon... (well, we can hope, can't we?)


Read and post comments | Send to a friend

Wednesday, April 23, 2008

What comes between Easter and Mother's Day?

Please check out www.flickr.com/knittycat for larger photos and all of the peeps.


What comes between Easter and Mother's Day?
This post, apparently.  ;o)

This blog is becoming a holiday affair... Quite unintentionally, I assure you.   But since I make a lot of peeps as holiday gifts, it's just been happening that way.
I'm busting out of that mold today, though.  

Belated Easter for Kristina & Mia:
Last Sunday, we had a happy family gathering, celebrating 3 birthdays, and belated Easter for our two younger nieces, whom we hadn't seen since Christmas.


  Mia and Kristina got their Eggy/Bunnies, Eggletina and Eggalia:


(Made with Softee Baby "Rocking Horse" and RH Baby Teri "Baby Print")


Their fuzzy lambies, Lambie Pinkletoes and Lambie Meringue:


(made with  TLC Baby Amore and Paton's Be Mine*, respectively)


(Patterns for the Eggy/Bunnies and Wee Lambie Peeps will be coming in the next post.)

* I am not recommending knitting peeps with Paton's Be Mine though, because it's so hard to work with, even though it does make a yummy soft and fuzzy fabric. *


And we (finally) gave Kristina her Christmas Cookie Monster!  
Made after Christmas, to replace the one that Kristina didn't get at Christmas.


When we gave an Elmo to Mia and a Cookie to Kristina for Christmas, wee Mia "adopted" Cookie with such fervor that no one had the heart to take him away from her, least of all, sweet Kristina.  So I promised to make Kristina a replacement.  And finally, she has him! And she was delighted with him!  Hurray! 

(Cookie Monster Pattern is available free!  See patterns and tutorials.)


Cookie Monsters for Mia, Kristina, and D

Here are all three Cookie Monsters, D's - the original - and Mia's and Kristina's.  You might notice that D's felt that he should have a Christmas scarf as well!  :o)


Tony's birthday goodies:
The main purpose of our gathering, was to celebrate Tony's birthday.  For the occasion I made some goodies for him.


He LOVES hot bright colors, especially orange, red, and yellow, so I made a simple cotton washcloth with a very bright colorway of Sugar and Cream.  Just a plain garter stitch. But it made a wonderful zigzag pattern, and the garter st made it nice and cushy.  :o)
Don't you love multicolor yarn? You never know what you're going to get.


Next - a money bag, stockinette st, in the round, bright yellow, lion brand soft baby, with a big red dollar sign on one side and a big red t on the other.  Filled with money of course.  :o) a teen boy's fave gift. 

An interesting feature is the closure: I felt that tying the drawstrings or using a bead would be too bulky, but it needed to close pretty securely so the money wouldn't fall out, so I knitted a strip and wrapped it around the drawstrings, snugly, and sewed it closed, making sure it still would slide.  It worked just great!


And last - but of course not least to a peep or amigurumi lover - a skateboarding monkey peep, Maximillion, with a backpack full of bananas! 

He prefers being called Maxie, by the way.


Making the teensy backpack was such fun!  I felt like Gulliver in the land of Lilliput.  :o)


We owe the skateboard to chez michelle... I'd considered making one, since Tony loves skateboarding, but I wasn't sure how a knitted skateboard would come out, so I hesitated to make it.  But then I saw this wonderful ami [here] by chez michelle and saw how feasible the skateboard was.
 
Construction  comments:
Maxie was made with Bernat Microspun Mango, and bright yellow, Lion Brand Soft Baby, using my Wee Lambie Peep Pattern (free pattern for the Lambies coming in my next post, along with the pattern for the Eggy/Bunnies).  I made him with longer legs and arms (appropriate for a monkey), and slight modifications for the ear shape.  And, of course I did some simple colorwork (which I don't like doing), for the face.  The face and head were made the same way as the lambies, but after stuffing and closing his head, I needle-sculpted his face to give him a more monkey-shaped muzzle.


His skateboard was made with two strands of size 10 crochet cotton, and size 1 needles.  Knit in the round, a simple tapered tube, then slipped a piece of cardboard in (cut to fit) and closed up.  Added seed beads for wheels and a piece of yellow beading elastic for a carrying strap.
My DH and I were really happy with him!  :o)  and so was Tony, which is what counts, of course. :o)


Marvel Comics' The Human Torch for Matthew:
I couldn't have peeps for the other nieces and nephews and not have something for Matt, of course, so we took the opportunity to give him the "Human Torch" I'd finished a few weeks ago.


Unlike the Thing, the Torch peep is much more impressionistic.  He rather reminds me of a fire elemental.  He's quite small, doubleknitted in my "classic peep" style, with sz 3 crochet cotton (Senso) and size 2 needles.  The flames were crocheted in long strips (I've forgotten the hook size), and sewn on. 

The moment I saw that yarn, I immediately thought "The Torch!"

Matt seemed quite happy with him.  :o)


I'll be posting the Lambie and Eggy/Bunny patterns with the next post, and I hope that won't be tooooo long from now.


Also.... I'm actually working on a Kermit the Frog pattern (as I've received MANY requests!).  Making a Kermie for Kristina's June birthday, but it's a challenge, trying to remember how I made the original!  :o) 

Wish me luck!


Many thanks to all of you kind folks who have been so supportive, and so willing to comment so positively on my flickr.com pages, and elsewhere.  I appreciate it more than I can say.  It gives me strength to do the arduous work of pattern writing. It's arduous for me, anyway.  I like to just grab my needles and some nice yarn and just CREATE!!  Stopping and thinking about what I'm actually doing is quite a stretch.  ;o)


Cheers!